Quickstart
After this page you should have an API key, a generated SDK, and (on the CLI path) one server function you can call.
Two equal paths:
Path A — VS Code Extension. Faster if you want chat and the out-of-the-box functions explorer. Geared toward people who are less deep in the terminal.
Path B — CLI. For developers who live in a terminal (or an editor that is not VS Code). TypeScript or Python.
Skip Cursor-specific setup for now. GitHub Copilot is an optional extra: GitHub Copilot Extension.
Get your API key
Sign up for a PolyAPI account.
Complete the form to create a tenant on the instance and service tier you want.
Tip
Try free with no obligations by selecting the Trial Tier during sign up.
After you confirm the verification code, copy the API key and store it. You will not be able to get that plaintext again. Create a new key later if you lose it (Managing Users and API Keys).
The key is bound to your default environment. Path A and Path B both use this key.
Path A — VS Code Extension
Use Poly from Visual Studio Code.
Tip
Alternatively, you can use the public beta of our PolyAPI GitHub Copilot Extension with GitHub Copilot.
Please refer to GitHub Copilot Extension for more information.
Open Visual Studio Code
Open the Extensions pane from the sidebar.
Search for “Poly Assistant” extension.
Click on “Install”.
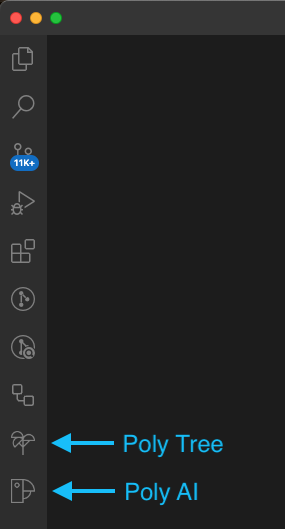
Once the extension is installed you should see the Parrot icon in your primary sidebar which opens the Poly AI chat panel.
If you opened an existing Poly project in VSCode the extension would automatically grab the project configuration to determine the project language type and authentication information needed to run the extension.
But since this is our first time the extension doesn’t yet know that information.
Open the Poly AI panel and click the “Setup Poly client” button to finish setting up the PolyAPI client SDK. The extension will guide you through the process of selecting the project type of your project (the programming language you’re using) and setting up your API key.
Warning
The VSCode Extension only supports a single language per VSCode workspace. To use multiple languages with PolyAPI keep each language in it’s own folder and open each in their own instance of VSCode where the extension can be configured separately for each language.
Asking questions
Once the extension is setup fully you should see the Palm Tree icon in your primary sidebar which will allow you to explore dozens of APIs provided out-of-the-box by PolyAPI as well as any APIs and functions you create.
In addition to exploring the SDK you can chat with the Poly Assistant which has full access to the same generated SDK.
Click the Parrot icon to open the AI chat panel, and click where is says “Ask Poly about APIs and Events” to get chatting.
You can ask Poly about anything related to PolyAPI, and have it write code using your generated SDK. For example, you can ask:
“How do I create a new contact on Hubspot?”
“How do I search for a customer on Stripe?”
Feel free to ask about whatever API you’re interested in!
If you run into any issues or feel that Poly is unclear, please email support@polyapi.io.
Path B — CLI
Install the SDK for one language, run setup, generate, deploy a hello-world server function, and call it. Full install notes (Node versions, venv, EACCES, gitignore for keys) live on the language pages. Do not skip those warnings.
TypeScript
npm initthennpm install polyapi@na1(use@eu1on EU1).npx poly setup— enter instance URL and API key.npx poly generate.Create
hello-world.ts:async function helloWorld(): Promise<string> { return 'Hello Poly World!'; }
Deploy:
$ npx poly function add helloWorld ./hello-world.ts --context "myContext" --server
Call it (after generate finishes):
import poly from 'polyapi';

(async () => {
    console.log(await poly.myContext.helloWorld());
})();
$ npx ts-node ./index.ts
Details: TypeScript (Node).
Python
Create a venv. Python 3.10+; 3.12 is a good default. Install
polyapi-python(that package name, not a similarly named one).python -m polyapi setupthenpython -m polyapi generate.Create
hello.py:def hello(): return "Hello Poly World!"
Deploy:
$ python -m polyapi function add hello hello.py --context mycontext --server
Call:
from polyapi import poly
print(poly.mycontext.hello())
Details: Python.
OpenAPI generate/train is TypeScript CLI only today. Python-first teams should train API functions with Using Postman, then python -m polyapi generate. See Using OpenAPI Specs.
Onward
Train an API Function and call it from the SDK. Then First integration. Function kinds: Functions. Role paths: Next Steps.